Understanding and Implementing Marko Widgets

This post gives a overview of Marko Widgets, some missing information on MarkoJS site about the way it works with code samples.
About MarkoJS
Let us look briefly about what is MarkoJS and why it is needed. MarkoJS site says it is a “A high performance templating engine and UI component building library”. Its competition consists of Moustache and HandlebarsJS.
MarkoJS is html aware!
MarkoJS has the advantage of being HTML aware framework. It’s preprocessor converts html to js and serves it to browser while retaining all the markup and spaces. In the process it provides for various marko specific attributes and pre-processor directives for looping and branching there by dynamically generating the html from a bunch of marko templates. On the other hand Moustache and HandlebarsJS are text only frameworks which don’t convert html to js and don’t read and interpret any HTML markup. This difference allows MarkoJS to offer custom tags, for example which makes HTML code more readable. +1 to MarkoJS here.
MarkoJS has widgets!
While all the preprocessing is done on server side on node MarkoJS also provides for binding the html to actions via Marko Widgets. So we can write both server and client side code in one node module and MarkoJS takes care of doing the necessary to push the client side code to the browser transparently. It helps write clean code with good separation of concerns but If needed one can include jquery (or anything else) and there are hooks to do any kind of DOM interaction via the client side part of the widget node module. Nothing of this sort exists in Moustache and HandlebarsJS. +2 to MarkoJS.
MarkoJS claims speed benefit over other templating node based js libraries but that is something that I have not verified.
An app with MarkoJS and Marko-Widgets
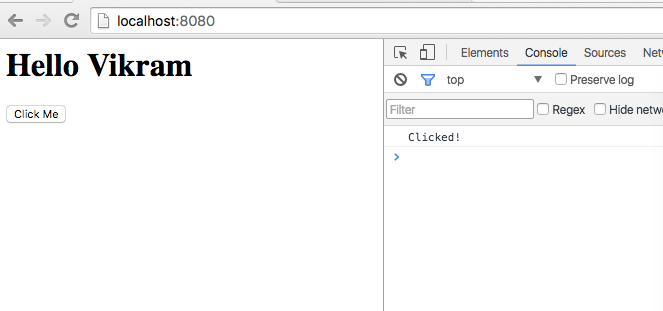
Let us create a simple app that has a welcome message and a button when clicked outputs a message on console in browser like this -
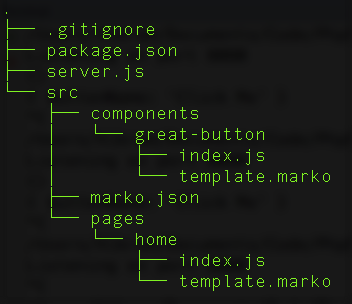
Step 1 : Basic folder structure for a markojs project
Create a basic source code structure as shown below -
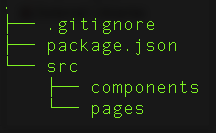
It consists of node package.json initialized with some information about the project (at the least empty braces) and two directories for marko pages and marko components of which the pages are composed of. We will have one page and one component (the button). Keeping it simple to focus on the framework nitty gritties rather then the app.
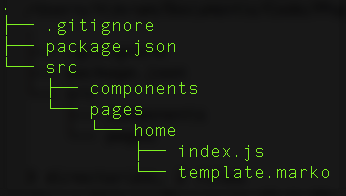
Step 2: The home page
Now create a structure for home page as follows that consists of two parts -
- template.marko - contains the html code (later with marko components)
- index.js - the node module style javascript code associated with the page
The source code structure would look -
Step 3 - The home page HTML
Home page HTML code would have a basic greeting with a place holder for value passed from the associated markojs node module based javascript initializer as follows -
src/pages/home/template.marko -
1
2
3
4
5
6
7
8

<html>
<head>
  <title>Hello - welcome to markojs</title>
</head>
<body>
  <h1>Hello ${data.name}</h1>
</body>
</html>
Step 4 - The node module style javascript binding for page
src/pages/home/index.js -
1
2
3
4
5

var template = require('marko').load(require('./template.marko'));
module.exports = function(req, res) {
  res.setHeader('Content-Type', 'text/html; charset=utf-8');
  template.render({name:"Vikram"}, res);
};
Step 5 - Setup node express server
Install marko, marko-widgets, express (web server that routes requests where marko templates are processed), server-static (serve static content like generated js and css files - covered later) and other required node modules as -
npm install marko express server-static marko-widgets --save
Setup express and marko modules as follows to start a web server -
server.js -
1
2
3
4
5
6
7
8
9
10
11

require('marko/node-require').install();
var serveStatic = require("serve-static");
//Express to server the above processed output
var express = require('express');
var app = express();
var port = process.env.PORT || 8080;
app.get('/', require('./src/pages/home/index'));
app.listen(port, function() {
    console.log("Listening on port "+port);
});
app.use(serveStatic(__dirname + '/build/static'));
Now run the node server by executing node server.js at the terminal and point your browser to http://localhost:8080. The data.name placeholder will be replaced with my name “Vikram”. You can play around at this point with the template markup with various markojs pre-processor directives like if-else and loops.
Step 6 - A brand new marko component
Now let us add a simple button called “great-button” as a marko component that can be included in our home page. Create two files associated with a typical marko object as below -
Before adding the component let us declare the folders for marko to lookup in for components while processing the tags in the pages via a file called “marko.json” as shown above. You can place this file anywhere and its contents have to be relative to its location. It has -
src/marko.json -
1
2
3

{
    "tags-dir":"./components"
}
src/components/great-button/template.marko -
1

<input type="button" value="${data.buttonName}">
src/components/great-button/index.js -
1
2
3
4
5
6
7
8
9
10
11
12
13
14
15

module.exports = require('marko-widgets').defineComponent({
      template: require('./template.marko'),
      init: function() {
            var el = this.el;
      },
      getInitialState: function(input) {
            return {
            };
      },
      getTemplateData: function(state, input) {
            return {
                  buttonName:input.buttonName
            };
      }
});
“getInitialState” is a callback to set initial state of the widget. “getTemplateData” is a callback to set variables that can be accessed in the marko template file via ${
1
2
3
4
5
6
7
8
9

<html>
<head>
   <title>Hello - welcome to markojs</title>
</head>
<body>
   <h1>Hello ${data.name}</h1>
   <great-button buttonName="Click Me"/>
</body>
</html>
Restart node server (yes restart is required) and refresh the page in browser to see a button with title “Click Me”. buttonName=”Click Me” is sent as input parameter dictionary containing {buttonName:”Click Me”} in various callbacks in great-button component’s index.js. Feel free to play around at this point with more components, different data attributes and callback logic.
Step 7 - Convert the component to a Marko-Widget
Now to the last but most difficult part, add client side javascript code and necessary glue to make it all work where clicking on the button outputs a message “Clicked!” on the console. This requires marko-widget and it bundles the necessary javascript code that is meant for client side (browser).
A simple “
Install lasso and marko plugin for lasso.
1

npm install lasso lasso-marko --save
1
2
3
4
5
6
7
8
9
10
11
12
13

<lasso-page name="my-page" package-path="./browser.json"/>
<html>
<head>
  <title>Hello - welcome to markojs</title>
  <lasso-head/>
</head>
<body>
  <h1>Hello ${data.name}</h1>
  <great-button buttonName="Click Me"/>
  <init-widgets/>
  <lasso-body/>
</body>
</html>
The first line defines the name of the page which is also used as name for the dynamically created javascript file. It also defines a package file which includes the resources, components to be included in the html (and also has several options to package them in certain formats. More in Step 8 below).
<lasso-head> is replaced with css files while <lasso-body> is replaced with javascript files. It also takes care of determining the relative paths for the source files w.r.t to the template based on the package file.
<init-widgets/> is replaced with lasso widgets initializer javascript call as mentioned earlier above.
Step 8 - Configure lasso
Now add a lasso configuration lasso.json file with following contents -
1
2
3
4
5
6
7
8
9
10
11

{
  "plugins": [
    "lasso-marko"
  ],
  "outputDir": "build/static/",
  "fingerprintsEnabled": false,
  "urlPrefix": "",
  "minify": false,
  "resolveCssUrls": true,
  "bundlingEnabled": false
}
All the things above are self explanatory.
Step 9 - Add browser.json files to use lasso
Add browser.json files, one each to button component and home page. browser.json file is either automatically processed by lasso if referred to in a lasso page tag or if included in other browser.json files. The name can be anything but has to appropriately referenced in the lasso html tag or a json file in which it is included.
In our home page marko template has the lasso tag at the top that calls this file as browser.json, which is a lasso standard naming convention. Change it to suite your naming style. The page browser.json then includes the component browser.json as shown below.
src/components/great-button/browser.json
1
2
3
4
5

{
  "dependencies": [
    "./"
  ]
}
src/pages/home/browser.json
1
2
3
4
5
6
7

{
  "dependencies": [
    "require: marko-widgets",
    "require: ../../components/great-button",
    "./"
  ]
}
If merely referring to a folder then lasso looks for browser.json file inside it automatically
Step 10 - Configure lasso while starting the web server
1
2
3
4
5
6
7
8
9
10
11
12
13
14

require('marko/node-require').install();
//Lasso configuration
var lasso = require('lasso');
lasso.configure("lasso.json");
var serveStatic = require("serve-static");
//Express to server the above processed output
var express = require('express');
var app = express();
var port = process.env.PORT || 8080;
app.get('/', require('./src/pages/home/index'));
app.listen(port, function() {
  console.log("Listening on port "+port);
});
app.use(serveStatic(__dirname + '/build/static'));
Step 11 - Client side javascript for button click action
Bind great-button component as a widget and add click action (called handleButtonClick here) that is executed in browser -
src/components/great-button/index.js -
1
2
3
4
5
6
7
8
9
10
11
12
13
14
15
16
17
18

module.exports = require('marko-widgets').defineComponent({
  template: require('./template.marko'),
  handleButtonClick: function(event, el) {
    console.log("Clicked!");
  },
  init: function() {
    var el = this.el;
  },
  getInitialState: function(input) {
    return {
    };
  },
  getTemplateData: function(state, input) {
    return {
      buttonName:input.buttonName
    };
  }
});
Add w-bind attribute and click handler to the great-button tag in the page template as follows -
src/components/great-button/tempalte.marko -
1

<input w-bind type="button" value="${data.buttonName}" w-onClick="handleButtonClick">
Restart node server and refresh browser. Click on the button and open console to see every click emitting “Clicked!” message. I hope this helps in understanding the marko-widgets and the extra modules, configuration and glue code required to make it all work.
Adios!